How to Check an Amazon Main Image Before You Upload
A practical review of RGB 255 backgrounds, product edges, framing and export files, with a downloadable checklist and clear limits on what an edge check can prove.
An Amazon main image needs more than a background that looks white on your screen. Review the actual exported file for background color, product identity, framing and unwanted additions. A successful RGB check answers a narrow technical question; it does not certify the entire listing against Amazon's category rules.
This guide separates those checks so you can identify what to fix instead of regenerating the same image repeatedly. Use it for a physical product photographed on a phone or camera. Product-specific category exceptions still need a separate review in Seller Central.
- What each check tells you
- Review the export in five passes
- Diagnose the failure before making another image
- Download the review sheet
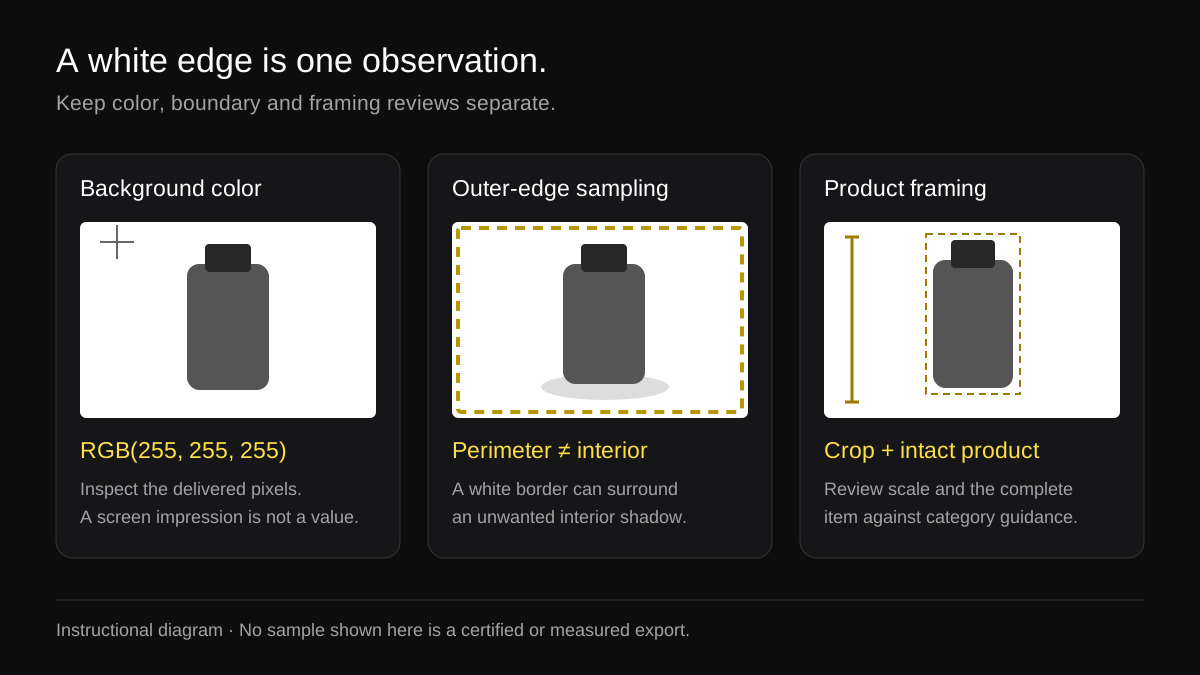
Illustrative review diagram. It shows three different checks, not a measured or approved product export.
What each check tells you
Start with Amazon's product image requirements. Main images and additional gallery images have different jobs. A lifestyle setting or a useful text callout can belong in a secondary slot while being unsuitable for the main image. Check the current rule for the exact product category and placement before preparing the file.
Swipe sideways to see every column
| Check | Question it answers | What it does not establish |
|---|---|---|
| RGB background | Are the inspected background pixels RGB(255, 255, 255)? | Whether every background pixel has been inspected |
| Outer edge | Are the exported canvas perimeter pixels white? | Whether an interior shadow, prop or badge remains |
| Product boundary | Are the outline, openings and fine parts preserved? | Whether the depicted item matches the physical SKU |
| Framing | Is the product large enough, complete and positioned appropriately? | Whether a loose bounding box measures true product coverage |
| Content | Does the image show the item and permitted contents without misleading additions? | Whether the listing's copy or category selection is correct |
RGB(255, 255, 255) is a color value. "85%" in main-image guidance is a framing concept. They are not interchangeable measurements, and passing one is not evidence that the other passed.
Start with a source photo you can verify
Before removing the background, compare the source photograph with the item being sold. Check color, finish, quantity, logo, included accessories and the exact variant. A clean image of the wrong lid, handle or package is still the wrong listing asset.
Use a source that shows the complete outline. Leave space around the item, light it evenly, and avoid a hand crossing its boundary. For a glossy bottle, move reflections away from label text. For a white ceramic product, use enough separation from the shooting surface to make the edge readable.
Keep the original photograph. It is your reference when deciding whether an edited result has changed a seam, erased a translucent cap or invented a detail. If the source hides an important part, another real photograph is usually a better input than asking an image model to reconstruct it.
Review the export in five passes
1. Identify the intended listing slot
Write down the SKU, variant and destination before judging the image. "Amazon main" and "Amazon gallery detail" should be separate roles. This prevents a lifestyle image being selected as the main simply because it is visually stronger.
For the main, inspect added words, graphic labels, decorative borders, props and anything that could imply an included item. Do not assume a secondary-image convention is allowed on the main. Packaging and category exceptions require the current category guidance rather than a blanket rule from a checklist.
If you need a text explanation, plan a separate infographic. Keep claims and measured dimensions tied to information you can verify about the real item. A background editor cannot establish that a bottle is leakproof or that a material has a certification.
2. Inspect color in the delivered file
Open the downloaded image, not a screenshot of the editor. Use an image editor with a numeric RGB color sampler. Inspect the four corners, the midpoints of each edge, and visible background regions nearer the product. Confirm that you are inspecting the image layer rather than the editor's surrounding canvas.
A spot sample is useful for finding a problem, but a handful of samples is not an exhaustive test. If a tool reports an outer-edge check, read its scope: checking perimeter pixels leaves the interior unmeasured. A gray shadow next to the item can coexist with a perfectly white perimeter.
For a transparent PNG, check how transparency will be flattened for the destination. A checkerboard is not a white background. In a separate export copy, use an opaque white canvas when that is required; keep the editable original so you can revise it later.
Work in RGB and use the destination's current file guidance. A profile change or a lossy re-export can change pixel values, so make the final check after the final save. Do not declare a color result from a thumbnail or a scaled browser preview.
3. Examine the product boundary at full size
Zoom to the image's actual pixels and work around the outline. Look for a light halo on a dark product, a dark fringe on a light product, missing cords, clipped handles, softened labels and filled-in openings. Then zoom back out. An edge that looks acceptable under magnification may still look artificial at shopping-thumbnail size.
Pay particular attention to transparent and reflective materials. A perfume cap can have both translucent edges and bright reflections; replacing both with opaque white changes the object. A mug handle must retain the visible opening. A necklace chain should not dissolve into disconnected fragments.
Reject a result when the edit changes the product. Fixing a small edge artifact is different from accepting an invented label or a modified silhouette. Compare directly with the source rather than relying on memory.
4. Review the crop and product coverage
Amazon's general main-image guidance uses an 85% product-fill requirement. Use the current category requirements to interpret the framing of your item, particularly for irregular shapes or packaging. Keep the entire relevant item visible and check that the image does not create an inaccurate impression of scale or quantity.
A simple width calculation can help diagnose excessive padding. For example, an item spanning 1,800 pixels across a 2,000-pixel canvas spans 90% of its width. That example is a width measurement, not proof that 90% of the image area contains the product, and not an Amazon compliance certificate.
Check thumbnail appearance after adjusting the crop. A tall bottle and a wide cable set need different framing decisions even on the same square canvas. Enlarging a small source until it fills the frame can expose blur; a new source photo may be the right fix.
5. Save and inspect the actual upload candidate
Give the export a name that identifies the SKU, variant and role, such as MUG-CREAM-01_amazon-main_v01.jpg. Keep the source and reviewed export in separate folders. This is an internal review filename. If you use Amazon's filename-based bulk upload, follow its product-identifier.variant.extension convention instead, such as B000123456.MAIN.jpg; an internal SKU work filename is not that upload convention.
Reopen the saved file and verify its dimensions, orientation and background after any conversion. Amazon's current image specification lists 500–10,000 pixels on the longest side and recommends 1,000 or more for zoom. Those are destination specifications, not a statement of every export size available in ProductVisualAI. Inspect the actual file and avoid artificially enlarging a small, blurry source.
Check the image in the upload preview as well. A marketplace can crop thumbnails differently from the full-size viewer. Review the listing after the upload has processed; do not treat selecting a file as the end of quality control.
Diagnose the failure before making another image
Swipe sideways to see every column
| Symptom | Likely issue to investigate | Next useful action |
|---|---|---|
| Corners look gray | Background is off-white or export altered it | Inspect numeric values in the final file and export again on opaque white |
| Edges pass, interior looks dirty | Interior shadow or background residue | Inspect the full background and revise the affected region |
| White rim around a dark item | Cutout halo or contaminated edge | Compare with the source and correct the boundary |
| Label letters change | Product identity drift | Reject the result and use a clearer source or a less generative edit |
| Item looks tiny in search results | Excessive padding or poor crop | Review framing while preserving the full product |
| Handle or cable disappears | Source contrast or masking problem | Improve the source and check fine parts before exporting |
These are diagnostic starting points, not automated classifications. Several issues can coexist. Record the visible defect and the file version you inspected so a later revision can be compared with the same reference.
Where ProductVisualAI fits
The white background generator prepares a main image targeting RGB(255, 255, 255) and exposes an outer-edge check. Treat that check as a useful part of the review above. It does not inspect every category rule, establish true product occupancy or verify all badges and props.
A still costs 1 credit. A listing ZIP costs 3 credits and includes a white main and a motion asset. Those are production choices, not different levels of marketplace certification. Use the asset-pack workflow to keep approved files distinct from outputs awaiting review.
Download the review sheet
Download the main-image review checklist (CSV). It provides a place to record the method, result and required fix for each pass. Duplicate it per SKU; do not copy a "pass" result from one color variant to another.
For a cream mug, for example, a useful review record would distinguish "perimeter values inspected" from "handle opening matches original." Those are separate observations. If you have not completed a check, leave it pending rather than converting uncertainty into a pass.
Questions that come up during review
Does a white edge prove the entire background is white?
No. The canvas perimeter does not include the interior. A backdrop stain, floor shadow or added object can remain inside a white border. Inspect background regions around the subject as well as the perimeter.
Should every product image use a white background?
No. The main-image job differs from secondary gallery, lifestyle and detail images. Choose the background for the slot and its current platform rules. Product identity and truthful presentation matter across all of them.
What if the image looks right but the marketplace rejects it?
Record the exact rejection message, category, slot and submitted file. Check the relevant rule against that file instead of guessing from a generalized score. A rejection can concern content or category-specific requirements that an RGB check never examined.
Sources and scope
This is a production review workflow, not a guarantee of Amazon acceptance. Consult Amazon's official product image requirements for the current rule and category exceptions. The technical distinction between perimeter sampling and a full-image review describes the scope of ProductVisualAI's check; it is not an Amazon-approved test. The diagram, example calculation and downloadable sheet are instructional materials created for this guide.